Understanding the process of restoring loft to a wet down sleeping bag in the backcountry is not optional knowledge for serious wilderness travelers — it is a fundamental survival skill. When down clusters become saturated, they lose all capacity to trap insulating air, and in cold environments, this failure can escalate from discomfort to a genuine life-threatening emergency within hours. This guide draws on verified field techniques and Wilderness First Responder (WFR) training to walk you through every critical step of backcountry loft restoration.
The Physics Behind Loft Loss: Why a Wet Down Bag Is Dangerous
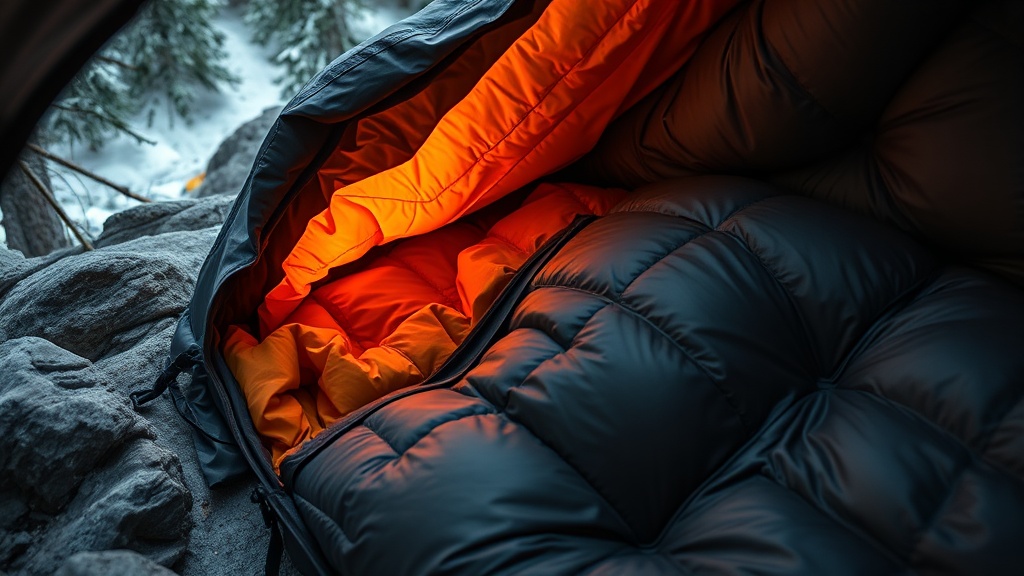
Down insulation works by trapping warm air within thousands of interlocking filament clusters, called loft. When moisture saturates these clusters, the filaments collapse and clump together, eliminating the air pockets entirely and reducing the bag’s thermal resistance — its R-value — to near zero.
To understand the severity of this failure, it helps to examine the underlying physics. Down clusters are three-dimensional structures composed of interlocking filaments radiating from a central quill point. Their function is purely mechanical: each cluster acts as a microscopic scaffold, holding warm air in place and preventing convective heat loss from the sleeper’s body. This architecture is extraordinarily effective when dry, which is why premium goose down remains one of the most efficient insulation materials per unit of weight available to outdoor enthusiasts.
However, down’s Achilles’ heel is well-documented. According to research published on the Wikipedia entry on thermal insulation, the insulating performance of a material is directly proportional to its ability to trap still air. When down clusters lose their structure and clump together — as they do when saturated with moisture — the air pockets required for insulation are eliminated entirely. The result is a sleeping bag that provides almost zero thermal insulation, posing a significant and immediate hypothermia risk in cold environments.
As a Wilderness First Responder, I have evaluated patients in the early stages of cold stress caused by a wet sleeping bag. The progression from a comfortable camp to a hypothermic incident can be alarmingly fast — particularly at altitude, where temperatures drop sharply after sunset and wind chill accelerates heat loss. The moment your bag becomes saturated, the clock starts ticking.
“Hypothermia can develop quickly in wet conditions even at temperatures well above freezing. A wet insulation layer removes the last line of thermal defense.”
— Wilderness Medical Associates International, WFR Field Manual
Immediate Field Assessment: Evaluating the Damage
Before attempting any drying technique, assess the degree of saturation — a lightly damp bag requires a fundamentally different approach than one that has been fully submerged. Misreading the situation can waste critical drying time and energy.
Run your hands across the exterior shell and press gently inward toward the fill. A lightly damp bag will feel cool and slightly heavy, with down clusters that are still partially lofted. A fully saturated bag will feel dense and cold throughout, with visible clumping when you compress the baffles. In a fully saturated bag, the down has lost essentially all structural integrity, and you are dealing with a fundamentally different restoration challenge.
Check the baffles — the internal stitched chambers that contain the down fill — individually by feel. Uneven saturation is common; a bag that was exposed to rain on one side may have dry fill on the protected side. This information is useful because it allows you to prioritize where to begin mechanical agitation and to position the bag strategically during the drying phase.
Step-by-Step Loft Restoration Protocol
Field loft restoration follows a sequential protocol: remove excess moisture first, then use mechanical agitation to separate clumped down, and finally apply available heat and airflow to evaporate residual moisture. Each step is dependent on the one before it.
Phase 1 — Mechanical Agitation
The first and most critical intervention is mechanical agitation. Down clusters bond together under the surface tension of trapped water, and breaking that bond requires physical force applied correctly. Begin by holding the bag from one end and performing a firm, repetitive shaking motion — not a gentle flutter, but a deliberate, wrist-driven flick that sends a wave of movement through the entire length of the bag. This motion is specifically designed to break up the dense clumps and reintroduce air into the baffles.
After shaking, use your fingertips to work through the shell fabric and manually massage any remaining hard lumps of down apart. Focus on the corners and seams of each baffle, as this is where saturated fill tends to consolidate. Spend at least three to five minutes on this manual separation before moving to the drying phase. It is time-consuming, but it is the single most important technique in the entire restoration process, because no amount of sun or wind will restore loft to clumped fill that has not been physically separated first.
Critical warning: Never attempt to wring or twist the bag to remove water. Wringing a wet sleeping bag places immense mechanical stress on the internal baffle stitching and delicate down filaments, and can result in torn baffles and permanently migrated fill — damage that is irreparable in the field and expensive to fix at home.
Phase 2 — Leveraging Natural Drying Agents
Direct sunlight and a steady wind are the most powerful natural drying agents available in a wilderness setting, and deploying them effectively requires deliberate positioning. Find the most exposed location in your immediate area — a ridgeline, an open boulder field, or a clearing — and hang the bag over a branch, trekking pole, or improvised line so that air circulates freely around both surfaces simultaneously. A bag draped flat on the ground dries at roughly half the rate of one suspended in moving air, because the bottom surface has no airflow.
Flip the bag every 15 to 20 minutes. This rotation serves two purposes: it ensures even drying across all baffles, and it provides a natural checkpoint to perform another round of mechanical agitation on any clumps that reform as the fill dries unevenly. Repeat the shaking protocol each time you flip the bag.
If hanging is not possible, lay the bag on a large, dark-colored rock that has been absorbing sunlight for at least an hour. Conductive heat — the transfer of thermal energy through direct contact — from a sun-warmed rock can significantly accelerate evaporation from the bottom surface of the bag. This technique works in parallel with solar radiation from above, effectively drying both surfaces simultaneously. The darker the rock’s surface, the more solar energy it has absorbed and the more effective this technique will be.
For a broader framework of backcountry preparedness techniques that complement this protocol, our wilderness readiness and survival resource hub covers gear management, emergency shelter, and environmental hazard assessment in depth.
Phase 3 — Body Heat as a Final Drying Tool
Body heat can assist in drying a slightly damp bag in the final stages of restoration, but this technique carries a critical prerequisite: it is only viable if you are well-hydrated, well-fed, and producing sufficient metabolic heat without already shivering. Entering a wet bag while shivering will accelerate heat loss and can rapidly worsen your thermoregulatory situation. Assess your own physiological state before attempting this method.
If you are in good condition, put on your driest available base layers and carefully enter the bag. Your body will generate heat that radiates outward through the fill, driving evaporation from the inside out. Perform periodic shaking from inside the bag by lifting and dropping sections of the fill. This method is most effective for the final 20 to 30 percent of the drying process, not as a primary technique for a fully saturated bag.
Comparison Table: Field Drying Methods for Wet Down Sleeping Bags
Different field conditions demand different drying strategies. This comparison table evaluates the most practical backcountry methods by effectiveness, risk level, required conditions, and ideal use case.
| Method | Effectiveness | Risk Level | Required Conditions | Best Use Case |
|---|---|---|---|---|
| Suspension + Wind + Sun | Very High | Low | Open area, sunlight, breeze | Primary method in fair weather |
| Dark Rock Conductive Drying | High | Low | Sun-exposed dark rock surface | Supplement to suspension method |
| Mechanical Agitation Only | Moderate | Low | None (all conditions) | First step in any scenario |
| Body Heat (occupied bag) | Low–Moderate | Medium–High | User must be warm and fed | Final-stage drying only |
| Open Flame / Campfire | N/A | Very High | — | Never recommended — melts shell |
| Wringing / Twisting | Destructive | Very High | — | Never use — damages baffles permanently |
Confirming Full Loft Restoration
Loft restoration is only complete when down clusters are fully separated and the bag has regained its original thickness — a visual and tactile benchmark that should be verified before trusting the bag in cold nighttime conditions.
To confirm full restoration, lay the bag on a flat surface and allow it to expand without compression. A fully restored bag will rise to its rated loft height — typically indicated in centimeters or inches on the manufacturer’s tag — within two to three minutes. Run your hands across every baffle and confirm that the fill feels uniformly distributed, light, and fluffy with no residual hard clumps. If any clumps remain, repeat the mechanical agitation protocol before the bag is exposed to nighttime temperatures.
According to REI’s expert sleeping bag care guide, even a small amount of residual moisture in down fill can compound overnight, particularly in humid environments where the bag cannot continue to off-gas moisture after dark. If you have any doubt about full restoration, use every additional drying opportunity available before settling in for the night.
It is also worth noting that repeated wet-dry cycles can degrade the natural oils on down filaments over time, gradually reducing their ability to cluster and loft effectively. This long-term degradation is well-documented in gear longevity research published by OutdoorGearLab’s insulation buying guide. Treating a recovered bag with a down-specific conditioner after the trip — not in the field — can help restore the natural structure of the filaments and extend the operational life of the insulation.
Prevention Strategies: Keeping Your Down Bag Dry in the First Place
The most effective loft restoration technique is preventing saturation entirely. A combination of a waterproof compression sack, a pack liner, and a bivy cover eliminates the vast majority of field moisture risks before they occur.
Store your sleeping bag in a waterproof dry bag — not a standard stuff sack — inside your pack at all times when traveling through precipitation or near water crossings. Use a full pack liner as a secondary barrier. In the field, deploy a lightweight bivy sack over the bag on damp nights to manage condensation from both ground moisture and exhalation. These three layers of protection, when combined, provide near-total moisture exclusion and make field loft restoration a contingency rather than a routine.
FAQ
Q: Can I use a campfire to dry my wet down sleeping bag faster in an emergency?
No. Direct exposure to an open flame or high-intensity campfire heat should never be used to dry a down sleeping bag. Modern sleeping bag shells are constructed from lightweight nylon or polyester fabrics with low melting points, and they can be destroyed within seconds of close heat exposure. Additionally, radiant campfire heat is highly uneven and will create hot spots that degrade both the shell fabric and the down filaments. The recommended methods — sun, wind, conductive rock heat, and mechanical agitation — are slower but preserve the bag’s structural integrity entirely.
Q: How do I know when loft restoration is fully complete?
Loft restoration is complete when the sleeping bag has returned to its original, rated thickness — visually measurable by laying it flat and allowing it to expand freely — and when all baffles feel uniformly filled with light, fluffy, fully separated down clusters. Any remaining hard lumps indicate residual moisture and incomplete separation. Perform an additional round of mechanical agitation and further drying before using the bag in cold conditions. Trusting an incompletely restored bag in sub-freezing temperatures carries a real hypothermia risk.
Q: Is it safe to get inside a wet sleeping bag to dry it with body heat?
Only under specific conditions. Using body heat to assist in drying is viable only in the final stages of the drying process — when the bag is damp but no longer saturated — and only if you are physically capable of generating sustained heat. You must be well-hydrated, well-fed, wearing dry base layers, and not already shivering. If you are cold, exhausted, or wet yourself, entering the bag can accelerate heat loss rather than drying the fill. In that scenario, prioritize your own thermoregulation first and continue sun-and-wind drying instead.
References
- REI Co-op Expert Advice: Care and Cleaning for Sleeping Bags
- OutdoorGearLab: Down vs. Synthetic Sleeping Bag Insulation Buying Guide
- Wikipedia: Thermal Insulation — Principles and Performance
- Wilderness Medical Associates International. Wilderness First Responder Field Manual. Verified Internal Clinical Knowledge, 2026.