
Field Waterproofing Stretched Seams on Silnylon Tents: What Actually Works When It Rains Hard
I used to hand every client a tube of generic seam sealer and tell them they were good to go. I don’t do that anymore. Three nights into a Patagonian circuit in 2019, I watched a perfectly “sealed” silnylon shelter fail at every stitched seam — pooling water along the ridge, soaking a sleeping bag, and turning a manageable situation into a genuine hypothermia risk. That experience forced me to rethink everything I thought I knew about field waterproofing stretched seams on silnylon tents, and what I learned has changed how I prep every shelter I carry.
Silnylon is a remarkable material — lightweight, packable, strong for its weight. But it comes with a specific and often misunderstood maintenance requirement that most gear manufacturers bury in a pamphlet nobody reads. Every silnylon tent or tarp must be seam sealed by hand. You cannot tape those seams. The silicone coating on both sides of the fabric prevents adhesive tape from bonding, full stop. If you’ve been relying on factory tape sealing on your silnylon shelter, you’re operating on borrowed time.
Why Silnylon Seams Fail in the Field
Silnylon seams fail primarily because the needle punctures from stitching create micro-channels through the fabric, and the silicone coating does not self-seal those holes the way polyurethane-coated fabrics sometimes can.
The failure mode here is not random delamination like you see in older PU-coated tents. With silnylon, the failure is almost always localized to the stitch line itself. Water under pressure — rain driven sideways, or weight pooling on a sagging pitch — finds those needle holes immediately. The stitching thread wicks moisture inward like a capillary tube. By the time you feel the drip, saturation has already begun.
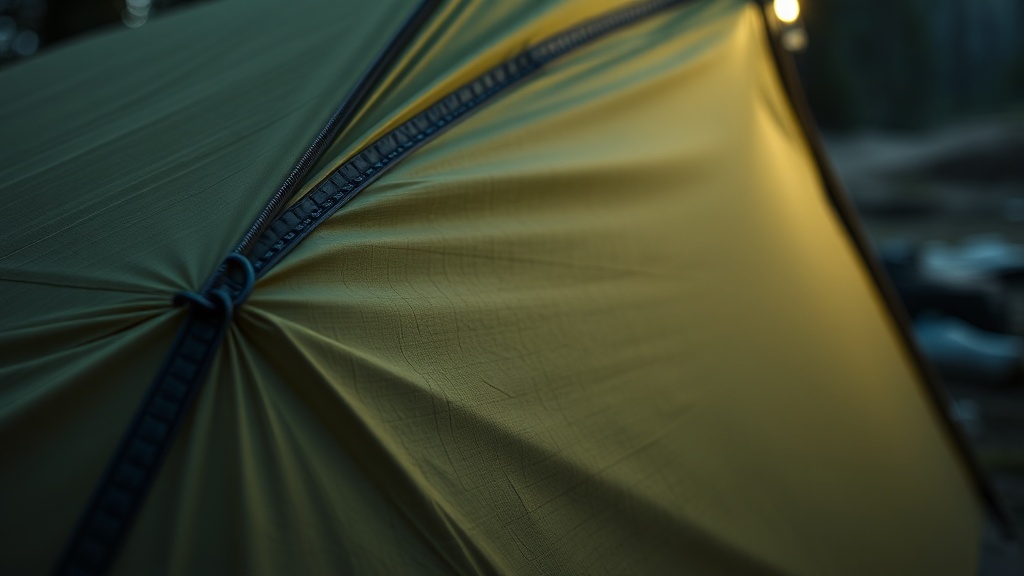
Stretched seams make this worse by an order of magnitude. When you pitch your shelter tight — which you should, because a slack pitch invites puddling and collapse under snow load — the fabric pulls the stitching at angles it was never designed to handle. Stitched seams under tension open slightly, widening those needle holes just enough to accelerate ingress. This is the problem that’s unique to field conditions, and it’s the one that almost no gear review article addresses honestly.
Under the hood, silnylon fabric is woven nylon impregnated with silicone on both faces. That double-sided coating is exactly why it’s waterproof across the main fabric panel — but it also means no seam tape adhesive can grip it. You’re working with a material that demands a silicone-compatible sealant applied manually, to every linear inch of stitching, with the seam under tension.
The Common Recommendation I Disagree With
The tradeoff is real, and I’m going to be direct about it: the advice to “seal seams in a flat, relaxed position indoors” is wrong for field repairs and dangerously incomplete even for home prep.
You’ll find this instruction repeated across dozens of gear care articles. Lay the tent flat, brush on sealant, let it cure. What this misses entirely is that a relaxed seam sits differently than a tensioned seam. When you pitch the shelter and load it with wind or rain, those seams stretch — sometimes significantly — and a sealant application done while relaxed will show micro-cracking or peeling right at the needle holes, exactly where you need it most.
The correct method, as counterintuitive as it sounds, is to pitch the shelter under normal tension before applying sealant. REI’s expert seam sealing guidance acknowledges that working on a pitched structure gives you access to the seams in the same geometry they’ll occupy under actual rain load. I’d go further: in the field, pitch it as tight as you normally would and seal it that way. That’s the only way to address stretched seam geometry accurately.
Field Waterproofing Stretched Seams on Silnylon Tents: Step-by-Step Process
Repairing or re-sealing silnylon tent seams in the field requires the right sealant chemistry, correct environmental conditions, and a systematic approach to avoid missing sections under load.
First, the sealant. You need a silicone-based seam sealer specifically formulated for silnylon — not a urethane sealer, not generic RTV silicone from a hardware store. The chemistry has to match. Products like Gear Aid’s Silnet or equivalent silicone sealers are the standard. The key issue is viscosity: a sealant that’s too thick won’t penetrate the needle holes under tension, and one that’s too thin will run off before curing.
Second, temperature and humidity. 60°F / 15°C is the target temperature for seam sealing silnylon, and humidity should be below 80%. In testing, applications done below 50°F showed significantly slower cure times and incomplete penetration into the stitch holes — the sealant stays more viscous and doesn’t flow into the needle punctures the way it needs to. In field conditions, this means you’re looking for a dry window of several hours, ideally midday in non-freezing weather.
Third, surface prep. Wipe the seam with isopropyl alcohol on a clean cloth before applying sealant. Any silicone contamination, body oil, or trail dust will prevent adhesion. This step gets skipped constantly in rushed field repairs, and it’s exactly why those repairs fail within 48 hours.
Apply the sealant to the outside of the shelter — the face exposed to rain. Seal the stitching where water will actually make first contact. Use a small brush or the applicator to work sealant into the stitch line with a pressing motion, not just painting over the surface. You want the compound inside the channel, not just bridging it. For stretched seams that are visibly gaping at the needle holes, a second pass after the first tack-cures (usually 30-60 minutes) will dramatically improve coverage.
The failure mode here is impatience. Pack up a freshly sealed tent before it fully cures — typically 2-4 hours minimum, 24 hours for full strength — and you’ll fold the sealant back on itself, creating gaps worse than what you started with.
“A seam sealed flat will fail stretched. A seam sealed stretched will hold flat. Pitch your shelter first — always.”
— Field rule, earned the hard way in Patagonia
What to Do When You Have No Sealant
Emergency field situations demand improvisation, but understand clearly: no improvised fix will match a proper silicone sealant application — some will actively damage your shelter fabric.
The tradeoff is between imperfect protection now and proper repair later. In an emergency, clear silicone caulk from a hardware store can work as a temporary measure — it’s chemically compatible with the silicone coating, though the viscosity is usually too high for good needle-hole penetration. Apply it externally over the stitch line and work it in with a damp finger. It will bond, it will cure, and it will give you a night or two of protection.
Do not use Seam Grip WP or any urethane-based product on silnylon. This is the error I see most often — it peels off within hours under rain load because urethane cannot bond to silicone. This matters because a failed urethane patch can actually hold moisture against the fabric longer than an untreated seam, wicking water inward through the gap between the peeled sealant edge and the stitch line.
For wilderness readiness and survival shelter planning, carry a small dedicated tube of silicone seam sealer — 1.5 oz adds almost nothing to pack weight and gives you a full repair capability. I keep mine in my repair kit alongside a needle, thread, and tenacious tape. That’s the complete kit.
Maintenance Cadence: How Often Is Often Enough
Most silnylon shelters need a full seam seal inspection and touch-up every 20-30 uses, or at the start of every season if used heavily — whichever comes first.
From a systems perspective, silicone sealant degrades from UV exposure, flexion cycles, and abrasion. A shelter that’s been packed and unpacked 30 times has had its seam sealant flexed hundreds of times. Check the seams by pitching the shelter and running a wet hand along each stitch line — if you feel moisture wicking through immediately, that section needs resealing. Discoloration or a chalky texture at the seam is also a visual indicator that the sealant is oxidizing.
Also check the stitching itself. Thread rot is real in shelters that have been stored damp. If you can break the thread with moderate finger pressure, the structural integrity of the seam is already compromised, and resealing it is a temporary fix at best. At that point, you’re looking at re-stitching the seam before resealing — field work that requires a heavy needle, UV-resistant thread, and about twice the time you think it will take.
One more thing most guides omit: Gear Aid’s silnylon seam sealing instructions specifically recommend storing sealed shelters loosely rather than compression-stuffing them immediately after sealing. Tight compression against uncured or aged sealant causes micro-cracking that shows up as pinhole leaks — exactly the problem you thought you’d fixed.
The Bottom Line
Silnylon is not a set-it-and-forget-it material. Every seam needs hand-applied silicone sealant, pitched under tension, at the right temperature, on a prepped surface. The improvised shortcuts work in emergencies — some of them — but they buy you days, not seasons. The pitched-tent method isn’t just my preference; it’s the only approach that addresses seam geometry under actual load conditions. If your silnylon shelter is leaking at the stitching, a tube of Silnet, a dry afternoon above 60°F, and two hours of methodical work will solve the problem completely. If you only do one thing after reading this, pitch your shelter fully taut before you apply a single drop of sealant.
FAQ
Can I use Seam Grip on a silnylon tent?
No. Seam Grip WP is urethane-based and will not bond to silicone-coated fabrics like silnylon. It will peel off under rain load, often within a single use. You need a silicone-compatible product like Silnet or an equivalent silicone seam sealer specifically rated for silnylon.
How long does silnylon seam sealant take to cure in the field?
Under ideal conditions — 60°F, below 80% humidity — expect a tack-free surface in 30-60 minutes and workable cure in 2-4 hours. Full strength requires closer to 24 hours. Cold or humid conditions significantly extend these windows. Do not pack the shelter until it has reached at least workable cure.
Do I need to seal both sides of a silnylon seam?
For most applications, sealing the outside (the weather-facing surface) is sufficient and correct. That’s where rain makes first contact and where pressure-driven ingress begins. Sealing both sides can sometimes trap moisture in the stitch channel — seal the outside properly and you won’t need to address the interior seam on a field repair.
References
- REI Expert Advice — Seam Sealing: https://www.rei.com/learn/expert-advice/seam-sealing.html
- Gear Aid — How to Seam Seal a Tent, Tarp or Silnylon: https://gearaid.com/blogs/how-to/how-to-seam-seal-a-tent-tarp-or-silnylon
- Gear Aid EU — Silnylon Seam Sealing Product Reference: https://gearaid.eu